Objective
The objective of this How-To guide is to assist the users in using the basic Loop commands to add images/words into a Word document using OpenBots Studio. Loop commands are great for performing certain sets of actions multiple times until the conditions set in the loop are no longer met. When the conditions for a loop have been broken, the loop will stop, and the automation continues to the next section of code. Loops are also used to loop through certain sets/collections of data like DataTables until either the conditions of the loop are broken, or all of the data has been processed successfully. In this guide, two types of loops will be used.
Walkthrough
The following are the steps involved in implementing basic Loop commands.
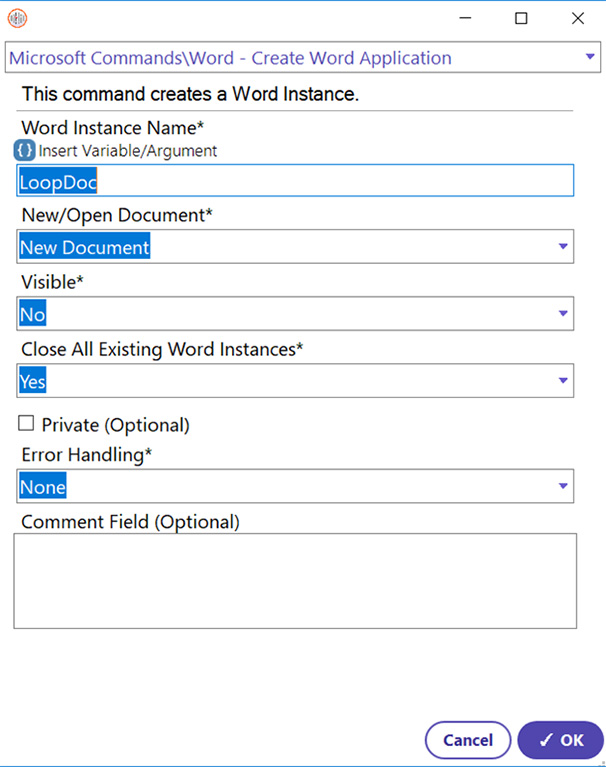
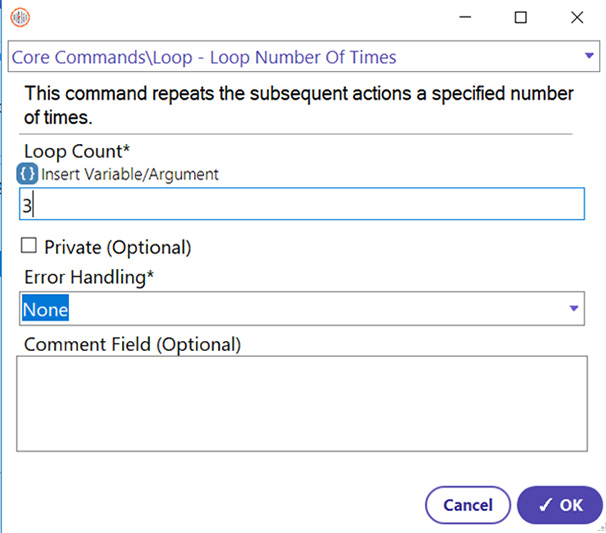
Step 1: Use the Create Word Application to add a blank document to the automation. This document will be the one that the titular images and words will be appended to. The instance variable can be named as the user sees fit.
  • Select the Create Word Application command.
  • Enter an appropriate Word Instance Name. (LoopDoc will be used for this guide.)
  • For the New/Open Document field, select the “New Document” option.
  • A file path is not needed because a new document is being created.
  • Select “No” for the Visibility option because visibility of the document while the automation is running is not necessary for this process.
  • For the Close All Existing Word Instances, select the “Yes” option to avoid errors.
  • Click OK
Step 2: Now, before the first kind of loop can be run, a variable will be needed in order to satisfy a condition that will be set later in Step 4 when the loop is created. For the sake of simplicity, a variable counter will be created of the Int32 type is initialized with the value 0 in Variables tab.
Step 3: This step in the guide is to specify what type of loop command will be used in the next step. This step is more for clarity. This will be done by appending text to the new document using the Append Text command. The reason that Append Text is used is because Append Text adds text to a document in the next available space.
  • Select the Append Text command.
  • In the Text field, enter a message that signifies the type of loop that will be used. The type of loop that will be used in the next step is the Begin Loop command.
  • For the next fields, the user can decide the style of the text.
  • Click OK
Step 4: The Do While command is used to start a loop/cycle while the given loop condition is true. Once the loop condition is false, it exits the loop. In this case, A loop condition (Number Compare) is selected from the dropdown menu. This is used to, as the name implies, compare 2 number values. If the condition is met, the code will keep running in the loop, otherwise it will exit the loop. This is only one of the different types of conditions that can be selected for the comparison and will be used in this guide for the sake of simplicity.
  • Select the Do While command.
  • Select the “Number Compare” option in the Loop Condition dropdown. This option is for comparisons that involve the <, <=, >, and >= operators. This command is also used to check if values are equal or not. (This field will auto-populate the available fields in the Additional Parameters section to fit the selection chosen.)
  • In Number 1, input the variable created earlier.
  • Input the Operand: is less than. (The reason that “is less than” is chosen is because loops will always start counting at zero. This means that if “is less than or equal to” is chosen, then the loop will be run 4 times. This is because it will start at 0, then 1, then 2, then 3, and when it reaches 4, the loop will stop because 4 is not less than or equal to 3. This same rule applies to almost all loop commands that involve using numbers for counting. It does not apply to the Loop Number of Times command.”
  • Input Number 2: 3 (This will cause the loop to only run 3 times.)
  • Click OK
Note: Whenever a loop is added, an End Do While command is also added. Also, the loop condition can be set to all sorts of different options, like loop while certain GUI elements exist or loop while a certain file exists.
Step 5: Within the loop, add an Append Text command to append text into the Word document. This text will be appended to the document every time the loop is run. Also use the Append Image command to append an image as well.
Step 6: Still within the loop, use the Set Variable command to increment the variable created earlier by 1. This is to show that the loop keeps running till the value hits 3 in which case it will exit the loop. If the value within the loop criteria is never broken, then the loop will run infinitely until the automation itself is paused or stopped.
  • Select the Set Variable command.
  • In the Input Value, input the variable created earlier +1. This field is used to specify the value that the variable will be set to.
  • For the Output Data Variable field, enter the variable that will be changed. (vLoopNum)
  • Click OK
Note: This is what the code will look like at this point in the guide.
Step 7: Outside of the loop, append text to specify the next type of loop that will be used. In this case, it will be the Loop Number of Times type of loop. Because this command will be outside the loop, it will only be run once.
Step 8: The Loop Number of Times command is used to begin and run a loop a set number of times specified in the Loop Count field.
  • Select the Loop Number of Times command.
  • Insert Loop Count: 3 (User-defined)
  • Click OK
Step 9: Within the loop, use the Append Text command to append text into the Word document and append another image as well using the Append Image command.

Step 10: Finally, outside of the loop, save the Word document into the ProjectPath using the Save Document As command and close the Word Instance using the Close Word Application command. This marks the end of the process. Check out the results!

All the commands in this guide can be utilized alongside many of the other commands that will be discussed in later guides to perform several operations. Below is a snapshot of the process discussed in the guide.

Commands utilized for the above concepts (adding images/words in OpenBots Studio) are as follows:

Loop Commands: Do While, Loop Number of Times.

Word Commands: Create Word Application, Append Text, Append Image, Save Document As, Close Word Application

Variable Commands: Set Variable

Newsletter Bot

Lets stay in touch!

Join our weekly newsletter and follow us on social media.

Contact Sales
Call Our Experts!