Objective
The objective of this How-To guide is to demonstrate the functions of the Begin Multi Loop command, the Continue command, and the Break command. This will be done by opening an Excel file, extracting two numbers, and then using the Multi While command to increase the values until certain conditions are met.
Prerequisites
In order to follow along with this guide, it is recommended that the user create an Excel file that contains at least two rows that themselves contain two numeric values. The file does not need to be complex and a screenshot of the file that was created for this exercise has been attached.
Another prerequisite for this guide is for the user to add two counter variables for use in the automation. This can be done by clicking the Options button and selecting the Variable Manager. This will open up the window below. Click the Add button to add variables with default values of 3. These variables will be used as counters throughout the automation.
Walkthrough
OpenBots Studio enables the user to utilize Loop commands. Loop commands are very similar to If commands/statements in that Loop commands also check to ensure that certain conditions are met before performing the commands placed within them. The difference between the two however is that the actions within loop commands are performed repeatedly until the conditions set for the loop are no longer true whereas the If commands are one-time checks on the condition. This guide will mainly focus on the Multi While command, which is a loop command that possesses multiple conditions that need to be true in order to repeatedly perform the specified actions.
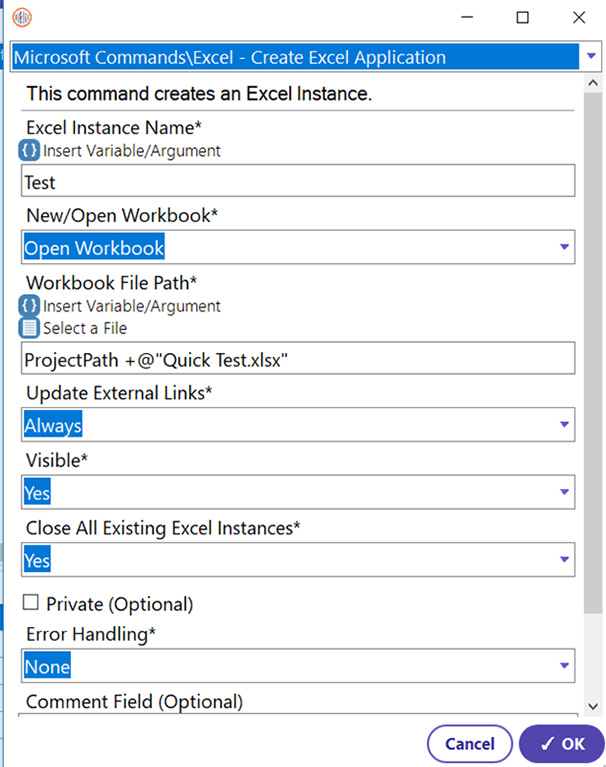
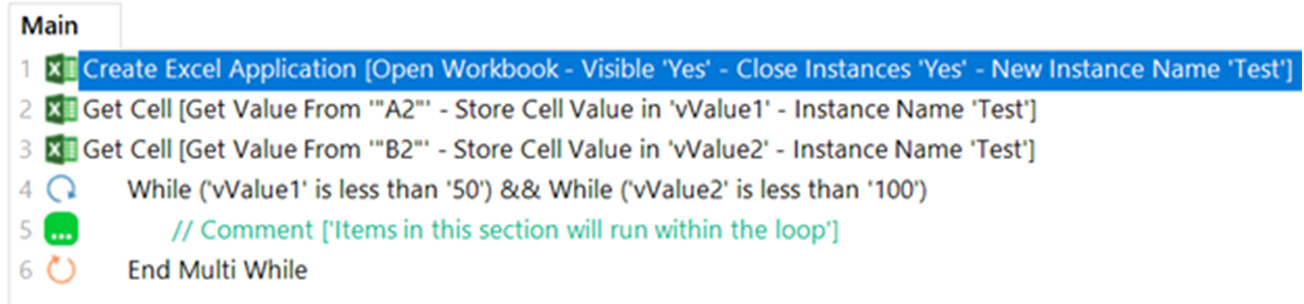
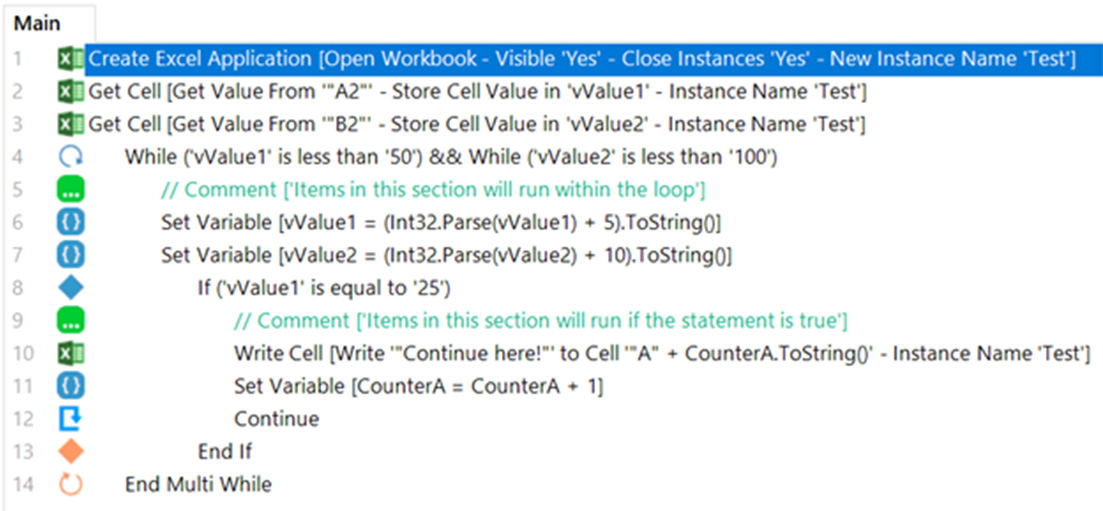
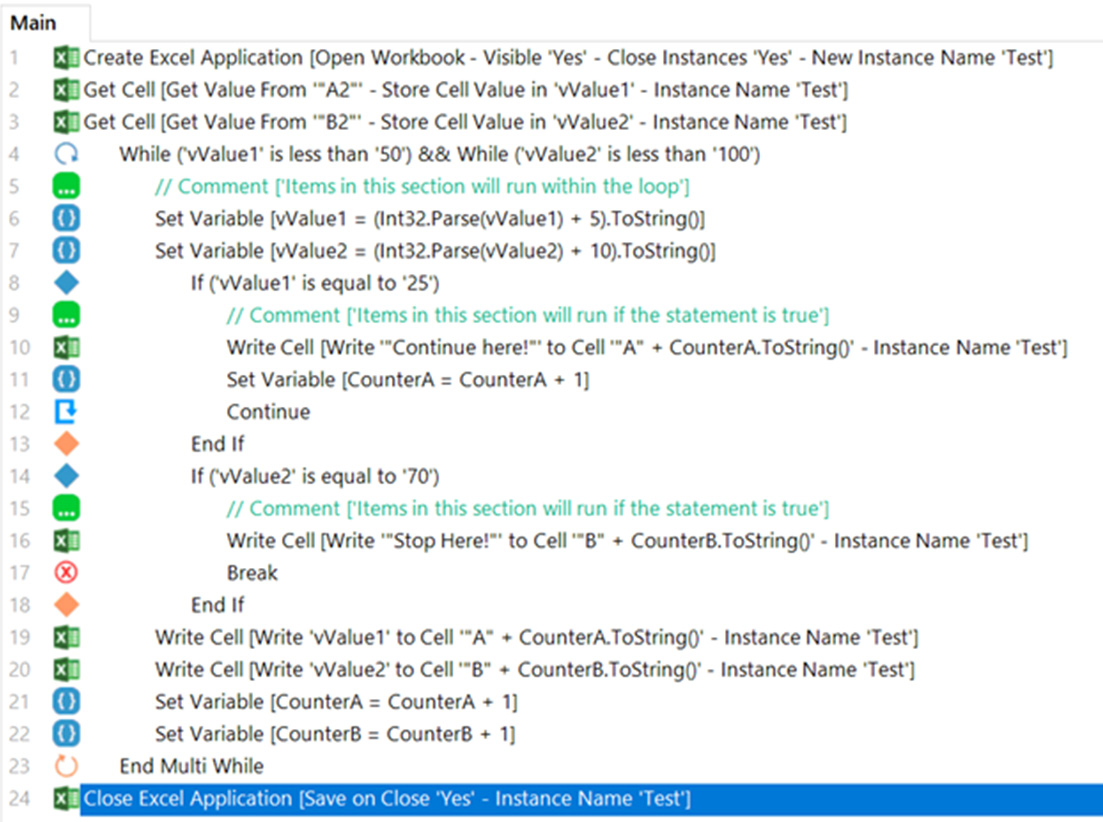
Step 1: In order to access an Excel file throughout the entire process, the Excel application must be opened, and instance must be created first. For a more in-depth explanation of the Excel commands used in this guide, please review the Excel How To Guides here (https://openbots.ai/product/openbots-studio/how-to-guide-for-openbots-studio/excel-automation/). The Create Excel command is used to open Excel and create a new instance.
  • Select the Create Excel Application Command
  • Enter the Excel Instance name (User’s Choice) (Variable used for this guide will be Test.)
  • Select “Open Workbook”
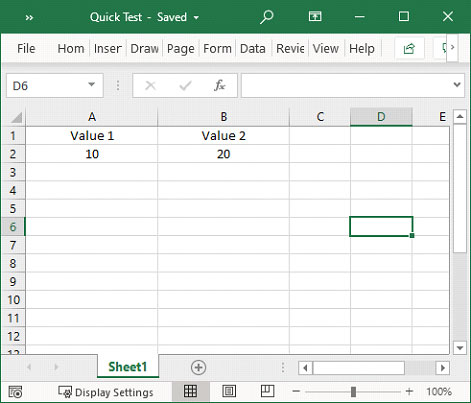
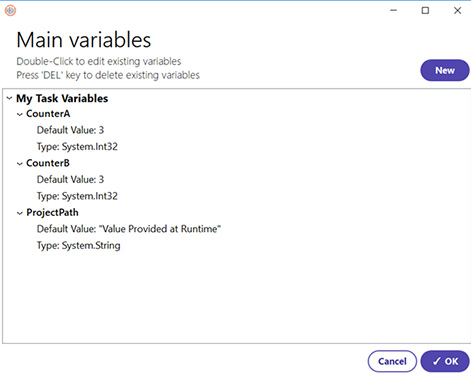
  • Enter ProjectPath\Quick Test.xlsx (By using Project Path, it can be ensured that the automation will always check the project folder)
  • Select the visibility criteria (Yes)
  • Select whether to close all existing Excel instances (User’s choice) (Yes)
  • Click OK
Step 2: In order two compare the two values within the Excel file that was just opened, the Get Cell command must be used to extract the two values and store them in variables.
  • Select the Get Cell command
  • Enter the Excel Instance name (Test)
  • Enter the Cell Location of the value that needs to be extracted (Depends on user’s file. For this guide, the value was in cell A2.)
  • Enter the name of the variable that will be created to store the cell value (User Choice) (This guide uses the name vValue1.)
  • Click OK
Step 3: The second cell value needs to be extracted as well and placed beneath the previous Get Cell command.
  • Select the Get Cell command
  • Enter the Excel Instance name (Test)
  • Enter the Cell Location of the value that needs to be extracted (Depends on user’s file. For this guide, the value was in cell B2.)
  • Enter the name of the variable that will be created to store the cell value (User Choice) (This guide uses the name vValue2.)
  • Click OK
Step 4: For the purposes of this guide, the numbers in the open workbook will be increased until said numbers each reach specified numbers. The Multi While command can be used to create the loops and specify the conditions for said loops. The loop created in this step will set the conditions for Value 1 (vValue1)
  • Select the Multi While command
  • Click the Add New Loop Statement button (This will open a separate Begin Loop window.)
  • In the While Loop window that was just opened, select Builder as the Condition Option and select the “Number Compare” Condition Type. In this dropdown, all of the different conditions that can be compared/checked using the Begin Loop command are listed. The Condition Type chosen will change the values in the “Additional Parameters” section of the window.
  • Enter the variable that contains the first cell value extracted into the “Number1” Parameter Value (vValue1)
  • Click the Operand dropdown and select an option. (User choice. This guide uses the “is less than” option)
  • Enter any number into the “Number2” Parameter Value. Once vValue1 reaches this value, the loop will end unless the loop is exited early. (This guide used the number 50)
  • Click OK. (This will close the While Loop window and add the Loop statement to the Multi While window.)

Note: Variables and values can be compared to each other using this and other Condition Types as well.

Example: vValue1 is less than 50
Step 5: While still in the Multi While window, another Loop statement needs to be added to the Multi While window because Value 2 needs to be increased as well.
  • Click the Add New Loop Statement button (This will open a separate Begin Loop window)
  • In the While Loop window that was just opened, select the “Number Compare” Condition Type.
  • Enter the variable that contains the second cell value extracted into the “Number1” Parameter Value (vValue2)
  • Click the Operand dropdown and select an option. (User choice. This guide uses the “is less than” option)
  • Enter any number into the “Number2” Parameter Value. Once vValue2 reaches this value, the loop will end unless the loop is exited early. (This guide used the number 100)
  • Click OK. (This will close the While If window and add the If statement to the Multi While window.)
  • Click OK on the Multi While window. (This will close the Multi While window, add the If statements created to the automation code, and add an End If command automatically.)

Note: The automation code created so far should appear similar to the screenshot below.

Step 6: Because the purpose of the automation is to increase Value 1 and Value 2 in the Excel sheet until the conditions of the loop have been met, commands that increase their values need to be added. This can be done with the Set Variable command. This command will be placed within the Loop command. (For a more in-depth explanation of the Variable commands, please check out the Variable Command How-To Guides).
  • Select the Set Variable command
  • Enter the Input Value (Int32.Parse(vValue1) + User-decided value).ToString(). (For this guide, a value of 5 was used).
  • Set the variable to modify to vValue1.
  • Click OK
Step 7:Value 2 needs to be increased as well, therefore vValue2 needs to be increased and this can be done with another Set Variable command.
  • Select the Set Variable command
  • Enter the Input Value (Int32.Parse(vValue2) + User-decided value).ToString(). (For this guide, a value of 10 was used).
  • Set the Output Data Variable to vValue2.
  • Click OK
Step 8:In order to demonstrate the function of the Continue command, a condition for it to be used will be needed. This can be done by adding an If statement that checks to see if vValue1 is equal to a certain value using an If command placed within the loop.
  • Select the If command
  • Select the “Number Compare” Condition Type.
  • Enter the variable that contains the first cell value extracted into the “Number1” Parameter Value (vValue1)
  • Click the Operand dropdown and select “Is equal to”
  • Enter a number into the “Number2” Parameter Value. (This guide used the number 25 because it is a number that is lower than the condition set for vValue1 in the loop conditions).
  • Click OK.
Step 9:Within the If statement that was just created, a Write Cell command can be used to demonstrate the purpose of the Continue command.
  • Select the Write Cell command
  • Enter the Excel Instance Name (Test)
  • Enter a message that states that, during the calculation for this number, Continue was used.
  • Enter the Cell Location “A” + CounterA.ToString(). (Setting the location to “A” + CounterA.ToString() makes the location of the message dynamic. CounterA will be used to keep track of the specific row in the first column of the Excel file that the loop is currently modifying.)
  • Click OK.
Step 10:After the cell has been written to, the automation needs to move on to the next row. This can be done with the Set Variable command. This command will be placed within the If statement.
  • Select the Set Variable command
  • Define the Input Value as CounterA+1. This will add 1 to CounterA when the If statement is reached.
  • Enter the Output Data Variable. (CounterA)
  • Click OK.
Step 11:Now the Continue command can be added. The Continue command will cause the loop to move back to the beginning of the loop.
  • Select the Continue command
  • Click OK.
Note: The code created for the automation thus far should appear as such.
Step 12:Between the End If command and the End Multi While command, an If command can be added to demonstrate the function of the Break command just like for the Continue command. The Break command is a very straightforward command that will exit the loop once it is reached, even if the loop has not fully completed.
  • Select the If command.
  • Select the “Number Compare” Condition Type.
  • Enter the variable that contains the second cell value extracted into the “Number1” Parameter Value (vValue2)
  • Click the Operand dropdown and select “Is equal to”
  • Enter a number into the “Number2” Parameter Value. (This guide used the number 70 because it is a number that is lower than the condition set for vValue2 in the loop conditions).
  • Click OK.
Step 13:Within the If statement that was created in the last step, a Write Cell command should be added to notify the user that this is the point in the automation where the Break command was used.
  • Select the Write Cell command
  • Enter the Excel Instance Name (Test)
  • Enter a message that states that, during the calculation for this number, Break was used. (For this guide, “Stop Here” was used as the message.)
  • Enter the Cell Location “B” + CounterB.ToString(). (Setting the location to “B” + CounterB.ToString() makes the location of the message dynamic. CounterB will be used to keep track of the specific row in the second column of the Excel file that the loop is currently modifying.)
  • Click OK.
Step 14:Now the Break command can be added. The Break command will cause the code to jump straight to the End Multi While command, ending the loop and moving on to any code that comes after the loop.
  • Select the Break command
  • Click OK.
Note: The code created for the automation thus far should appear as such.
Step 15:Between the End If and the End Multi While commands, the commands that will actually be used to write the increased values (which were increased in Steps 7 and 8) to the Excel file are more Write Cell commands.
  • Select the Write Cell command
  • Enter the Excel Instance Name (Test)
  • Enter the Cell Value. (vValue1)
  • Enter the Cell Location “A” + CounterA.ToString() (The cell location is dynamic just like in Steps 9 and 13).
  • Click OK.
Step 16:Another Write Cell command will be needed to write the second increased value.
  • Select the Write Cell command
  • Enter the Excel Instance Name (Test)
  • Enter the Cell Value. (vValue2)
  • Enter the Cell Location “B” + CounterB.ToString() (The cell location is dynamic just like in Steps 9 and 13).
  • Click OK.
Step 17:Now that the loop has performed all of the actions necessary for one row in the Excel sheet, it is time to increase the value of the counter variables so that the next time the loop runs, it will move to the next row in the Excel sheet where it can then write more values as the automation continues to go through the loop. This can be done with two more Set Variable commands.
  • Select the Set Variable command
  • Enter the Input Value CounterA+1
  • Enter the Output Data Variable. (CounterA)
  • Click OK.
Step 18:The second counter needs to be increased as well.
  • Select the Set Variable command
  • Enter the Input Value CounterB+1
  • Enter the Output Data Variable. (CounterB)
  • Click OK.
Step 19:For the last step in the process, the Excel application needs to be closed and saved. This can be done with the Close Excel Application command. This command will be placed after the End Multi While command. This marks the end of the process.
  • Select the Close Excel Application command
  • Enter the Excel Instance Name (Test)
  • Select a Save Workbook option. (Yes)
  • Click OK.
All the commands in this guide can be utilized alongside many of the other commands that will be discussed in later guides. Below is a snapshot containing the commands used to compare variables using OpenBots Studio. Feel free to run the code to test out the automation!

Commands utilized for the above concept (Counting Up) are as follows:

Loop Commands: Multi While, End Multi While, Continue, Break,

Excel Commands: Create Excel Application, Get Cell, Write Cell, Close Excel Application

If Commands: If, End If

Variable Commands: Set Variable

Newsletter Bot

Lets stay in touch!

Join our weekly newsletter and follow us on social media.

Contact Sales
Call Our Experts!