Objective
The objective of this How-To guide is to demonstrate some of the basic functions of the Word commands in OpenBots Studio. This will be done by creating a Word application and a new Word document using the Create Word Application. The document will then be edited, saved, and finally closed using the Append Text, Save Document, Save Document As, and Close Word Application commands, respectively. Most processes require utilization of Word to append text, data tables and images to different documents according to the project’s specific requirements. OpenBots Studio enables the user to do this by creating an instance of a Word application and then using other commands to call, add, or edit a specific Word file throughout an entire process. In other words, OpenBots makes editing a Word document incredibly simple!
Walkthrough
The following are the steps involved in creating and opening a Word document in OpenBots Studio. The automation procedure involves click level operations from the Word command list.

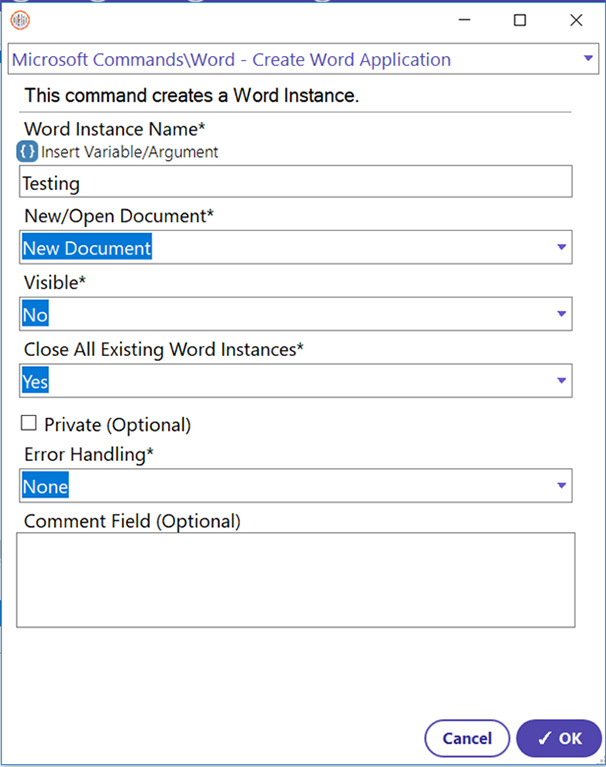
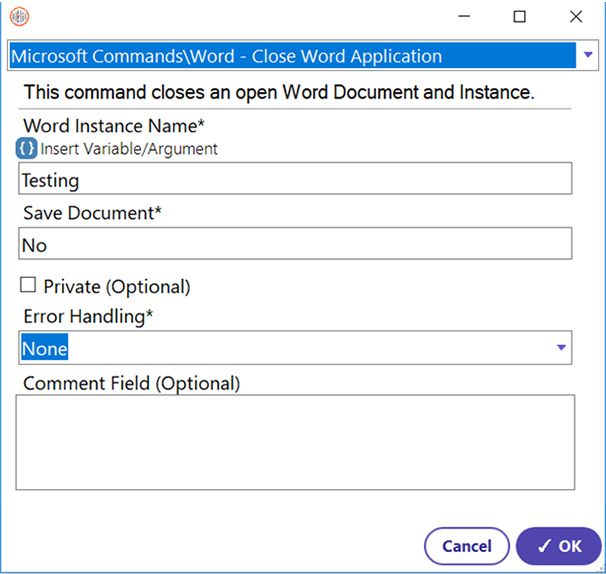
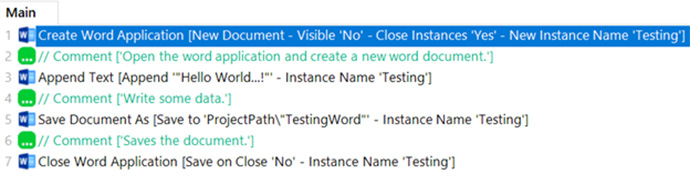
Step 1: To access a Word file throughout the entire process, a global instance must be created first so that automation can differentiate between different Word windows (if multiple are created). The Create Word Application command helps in performing this task.

  • Select Create Word Application command
  • Enter a Word Instance Name. (This is the OBAppInstance variable used to identify the Word file opened by this command and used throughout the automation.) (Example: Testing)
  • In the New/Open Document field, choose the “New Document” option to create and open a new Word document. If the user wants to open a document, then select “Open Document” and provide the file path to the document.
  • The Document File Path parameter will only appear when opening a document. If the user were to try and open a document, entering ProjectPath +@ “\FileName.extension” (replacing FileName.extension with the desired file name and extension) causes the automation to look in the project folder next to the Main.JSON and project.config files. This will ensure that the file path will be valid on any computer that the automation is run on.
  • Set Visibility to “No” because viewing the document while the automation runs is not necessary for this guide.
  • Set the Close All Existing Word Instances field to “Yes” so that any existing open Word instances are closed and do not interfere with the automation.
  • Finally, Click OK.

Step 2: After the Word application instance has been created, the automation can now access said instance in order to write to the document using the Append Text command. The document will be associated with this instance only, so if any other Word applications are created with the same Word Instance Name, then the automation may throw an error as it does not know which application to perform the specified actions on. To perform any operations on a Word document, the instance must be specified first in order to avoid the issues presented above.

  • Select the Append Text command. (In order to write data into the Word document.)
  • Enter the Word Instance Name. (Global instance created before) (Example: Testing)
  • Insert the text, in this example the “Hello World…!” text is being appended.
  • Select the desired style of Font Name, Size, etc. from the options provided.
  • Click OK.
The output of this command will provide the user with the word document created.
Step 3: Once a file has been appended with some data and edited (appending data tables, images and text to the document itself will be discussed in the Semi-Complex Word Commands Guide), it is ready to be saved. The Save Document command will save the document without changing the name that it had when it was opened or created. This command is useful for when already existing files are edited and need to be saved without a new copy being made. If a new document is created, the Save Document As command must be used instead. When using a preexisting document, follow the following steps to use the Save Document command.
  • Select the Save Document Command
  • Enter the Word Instance Name (Global instance created before) (Example: Testing)
  • Click OK
Step 4: Once the Word document has been edited, the user might want to save the file as an edited copy of the original. This command will save the file as an edited copy under a new name.
  • Select the Save Document As command
  • Enter the word Instance name (Global instance created before) (Example: Testing)
  • Select the folder to save the new file within. (Remember the {ProjectPath} mentioned in Step 1.)
  • Within the Document File Name field, type the desired name for the file. (TestingWord)
  • Click OK
Step 5: Once the process has been completed, the Word instance must be closed using the Close Word Application command. It is important to close these instances to avoid errors caused by the file already being open when the process is executed more than once.
  • Select Close Word Application command
  • Enter the Word Instance Name (Example: Testing)
  • Select the “No” option in the Save Document field. (No, as the file was already saved.)
  • Click OK
All the commands in this guide can be utilized alongside many of the other commands that will be discussed in later guides. Below is a snapshot containing most of the commands used to create and access a Word document in this guide.
Commands utilized for the above concept (Creating & Accessing Word Document) are as follows:

Word Commands: Create Word Application, Append Text, Save Document, Save Document As, Close Word Application

Newsletter Bot

Lets stay in touch!

Join our weekly newsletter and follow us on social media.

Contact Sales
Call Our Experts!